Fishing rod guide repair kits offer anglers a cost-effective solution for maintaining their equipment, encompassing epoxy, thread, and replacement guides.
These kits provide essential components for addressing common issues like damaged or broken guides, extending the lifespan of valued fishing rods.
Repairing guides is a practical skill, saving money and ensuring optimal performance on the water, as demonstrated by resources like Milliken Fishing.
What is a Fishing Rod Guide Repair Kit?
A fishing rod guide repair kit is a comprehensive collection of materials designed to fix damaged or broken guides on a fishing rod.
Typically, these kits include replacement guides (tip tops and running guides), epoxy resin and hardener for secure bonding, and specialized wrapping thread.
Essential components also often feature guide foot solvent for preparation, enabling anglers to restore functionality and prevent further damage, as highlighted by various online retailers.
Why Repair Instead of Replace?
Repairing a fishing rod with a repair kit is significantly more economical than replacing the entire rod, offering substantial cost savings for anglers.
It’s also a sustainable practice, reducing waste by extending the life of existing equipment.
Furthermore, skilled repairs can restore a rod to its original performance, preserving sentimental value or maintaining a favorite action, making it a practical and rewarding solution.
Understanding Fishing Rod Guides
Fishing rod guides manage line flow, reducing friction and preventing tangles; they come in various types, constructed from materials like stainless steel and ceramic;
Understanding their function is key for effective repair.
Types of Fishing Rod Guides
Fishing rod guides are categorized by function and design, including tip-top guides, crucial for smooth casting, and running guides along the rod’s length.
Guide materials vary; ceramic rings within stainless steel frames are common, minimizing friction.
Specialized guides, like snake guides, are used for specific fishing techniques.
Kits often include a selection of these, allowing for comprehensive repair and replacement, ensuring optimal line control and preventing damage.
Materials Used in Guide Construction
Fishing rod guides commonly feature stainless steel frames for durability and corrosion resistance, essential for longevity in harsh environments.
Ceramic rings, like aluminum oxide or silicon carbide, minimize friction and heat during casting, protecting the fishing line.
Repair kits supply these materials for replacement;
High-quality kits prioritize durable materials, ensuring the repaired guide withstands stress and maintains performance, enhancing the overall fishing experience.
Common Guide Failure Points
Fishing rod guides frequently fail due to impact from casts hitting hard surfaces, leading to cracks or complete breakage of the ring or frame.
Corrosion, especially on saltwater rods, weakens the metal components over time, causing failure.
Guide feet can also strip away from the rod blank, requiring re-wrapping and epoxy application.
Repair kits address these issues, offering replacement guides and materials to restore functionality and prevent further damage.
Essential Components of a Repair Kit
A comprehensive fishing rod guide repair kit includes replacement guides, epoxy resin and hardener, wrapping thread, and guide foot solvent for effective repairs.
Replacement Guides (Tip Tops, Running Guides)
Replacement guides are central to any repair kit, categorized into tip tops – the crucial guide at the rod’s end – and running guides along the shaft.
These come in various sizes and materials, often featuring stainless steel frames with ceramic rings for smooth line passage.
Kits frequently offer a selection to match different rod types and line weights, ensuring compatibility and optimal performance after repair. Durability and resistance are key features.
Epoxy Resin and Hardener
Epoxy resin and hardener are vital for securely bonding guides to the rod blank, providing exceptional strength and durability.
Repair kits include pre-measured quantities for convenient mixing, though precise ratios are crucial for proper curing.
High-quality epoxy resists water intrusion and impact, ensuring long-lasting repairs. Avoiding bubbles during mixing is essential for a clear, strong finish, as is proper curing time.
Wrapping Thread
Wrapping thread, typically nylon or silk, forms the foundation for securing fishing rod guides, creating a smooth, tapered build-up for epoxy application.
Kits often include a variety of colors, allowing for customization or matching existing rod aesthetics.
Proper thread tension is critical; too loose and the guide will be unstable, too tight and it can damage the rod blank. Consistent wrapping ensures a durable bond.
Guide Foot Solvent
Guide foot solvent is a crucial, often overlooked component in a fishing rod guide repair kit, designed to thoroughly clean the rod surface before epoxy application.
It effectively removes old epoxy remnants, grease, and contaminants from the guide feet and rod blank, ensuring a strong, lasting bond.
Proper cleaning prevents adhesion failures and guarantees the repair’s longevity, contributing to a professional-quality finish.
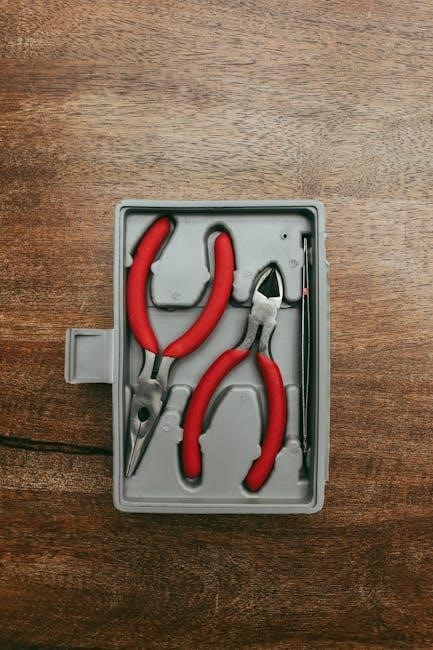
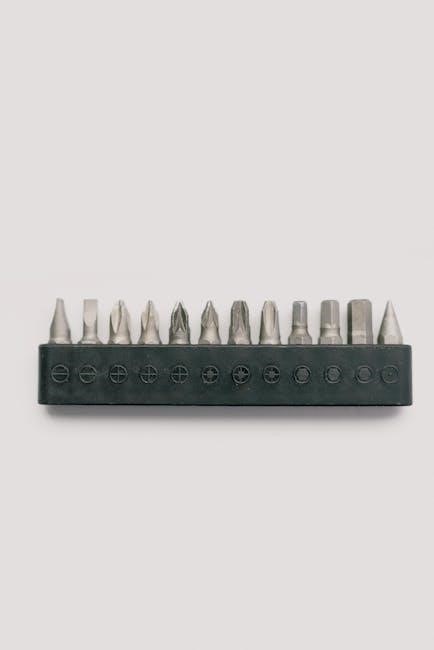
Tools Required for Repair
A successful fishing rod guide repair demands specific tools: a reaming tool, files, mixing supplies, and potentially heat shrink tubing for professional results.
These tools facilitate precise guide removal, surface preparation, and secure epoxy application.
Reaming Tool
Reaming tools are crucial for safely removing old fishing rod guides without damaging the blank itself. These specialized tools effectively clear away residual epoxy and thread.
They come in various sizes to match different guide foot diameters, ensuring a clean bore for the new guide. Using a reaming tool prevents splintering or cracking of the rod, preserving its structural integrity.
Proper technique involves gentle rotation and controlled pressure, avoiding excessive force.
File or Sandpaper
A file or sandpaper is essential for smoothing the rod surface after removing the old guide and before applying new thread wraps. This prepares the blank for optimal epoxy adhesion.
Fine-grit sandpaper (220-grit or higher) is recommended to avoid scratching the rod’s finish. Careful filing or sanding removes any remaining epoxy residue and creates a level surface.
This step ensures a professional-looking repair and enhances the durability of the new guide installation.
Epoxy Mixing Sticks and Cups
Epoxy mixing sticks and cups are crucial for accurately combining the resin and hardener components of the epoxy. Precise measurement is vital for proper curing and a strong bond.
Disposable plastic cups and wooden sticks are commonly used, ensuring no contamination affects the epoxy’s properties. Thorough mixing, avoiding air bubbles, is key to a durable guide attachment.
Using dedicated tools prevents cross-contamination and maintains epoxy quality.
Heat Shrink Tubing (Optional)
Heat shrink tubing serves as an optional reinforcement for fishing rod guide repairs, providing an extra layer of protection and durability to the thread wraps.
Applied over the epoxy-coated thread, heat shrinks to conform, creating a smooth, streamlined finish and preventing potential fraying or unraveling.
It enhances the aesthetic appeal and adds resilience against wear and tear during use.
Step-by-Step Guide to Replacing a Guide
Successfully replacing a fishing rod guide involves careful removal of the damaged component, meticulous rod preparation, precise thread wrapping, and proper epoxy application.
Removing the Damaged Guide
Carefully begin by using a guide foot solvent to soften the epoxy securing the damaged guide. Gently rock the guide to break the epoxy bond, avoiding excessive force that could harm the rod blank.
Utilize a reaming tool to carefully remove the remaining epoxy and thread wrappings from the rod. Ensure a clean surface, free of debris, for optimal adhesion of the new guide. Patience is key during this process!
Preparing the Rod Surface
After removing the old guide, thoroughly clean the rod surface with guide foot solvent to eliminate any residual epoxy or thread. Use fine-grit sandpaper or a file to gently smooth any imperfections, creating a level base.
Ensure the area is completely dry and free of dust before proceeding. A properly prepared surface is crucial for strong epoxy adhesion and a durable guide wrap, guaranteeing a long-lasting repair.
Wrapping the Thread
Begin wrapping the thread smoothly and tightly around the rod, starting slightly below where the new guide will sit. Overlap each wrap consistently, building up layers to create a secure foundation.
Maintain even tension throughout the process, avoiding gaps or loose areas. Several wraps are needed for strength. This thread base is vital for properly securing the guide foot with epoxy, ensuring a durable bond.
Applying Epoxy
Once the thread wraps are complete, carefully mix the epoxy resin and hardener according to the kit’s instructions – precise ratios are crucial for proper curing.
Apply the mixed epoxy liberally over the thread wraps, ensuring complete coverage of the guide foot. Use mixing sticks to avoid introducing air bubbles. A smooth, even coat is essential for a strong, lasting repair.

Tips for Successful Epoxy Application
Achieving a flawless finish requires precise mixing ratios, diligent bubble removal, and maintaining the correct curing temperature for optimal epoxy hardness.
Mixing Ratio and Consistency
Epoxy resin and hardener must be mixed precisely according to the kit’s instructions; deviations can lead to a soft, uncured, or brittle finish.
Typically, a 2:1 or 1:1 ratio is common, measured by volume, not weight.
Thoroughly combine the components, scraping the sides and bottom of the mixing container to ensure complete integration.
The ideal consistency resembles honey – smooth, flowing, and free of streaks, facilitating even application and proper adhesion.
Avoiding Bubbles
Bubbles within the epoxy can compromise the strength and aesthetics of the guide wrap; therefore, careful application is crucial.
Mix the epoxy slowly to minimize air introduction.
After applying the epoxy, gently warm the surface with a heat gun or lighter (carefully!) to encourage bubbles to rise and pop.
A toothpick can also be used to carefully remove any remaining surface bubbles before the epoxy fully cures.
Curing Time and Temperature
Epoxy resin requires a specific curing time and temperature to achieve optimal strength and adhesion when repairing fishing rod guides.
Generally, a temperature of 70-75°F (21-24°C) is ideal.
Allow at least 24 hours for full curing, though some epoxies may take longer.
Avoid disturbing the repaired area during curing, and protect it from dust or contaminants to ensure a robust and lasting repair.
Repairing Broken Rod Tips
Rod tip repair kits offer a simple solution for replacing damaged tips, including matching guide size and style for seamless integration.
These kits typically include epoxy for secure attachment, restoring functionality.
Using a Rod Tip Repair Kit
Rod tip repair kits streamline the process of restoring a broken rod end. Begin by carefully removing the fractured tip section, ensuring a clean break for optimal adhesion.
Next, prepare the rod shaft by reaming the inner diameter to accept the new tip. Apply epoxy to the tip’s spigot, then firmly insert it into the rod blank.
Secure with tape while the epoxy cures, guaranteeing a strong, lasting bond. These kits, available at tackle shops, offer a budget-friendly fix.
Matching Guide Size and Style
Selecting the correct replacement guide is crucial for maintaining rod performance. Consider the original guide’s inner diameter and frame style – stainless steel or aluminum – for a seamless match.
Tip guides require precise sizing to avoid line tangles, while running guides should align with the rod’s action. Kits often include a variety of sizes.
Prioritize guides with smooth ceramic inserts to minimize friction and protect your fishing line, ensuring a durable and effective repair.
Securing the New Tip
After applying epoxy to the rod tip, carefully position the new guide, ensuring proper alignment with the rod’s blank. Apply gentle pressure for several minutes to maintain contact during the initial set.
Wrapping thread around the guide foot reinforces the bond, creating a secure and durable connection. Multiple wraps are recommended for added strength.
Allow sufficient curing time – typically 24 hours – before using the rod, guaranteeing a reliable repair and preventing premature failure of the newly installed tip.
Advanced Repair Techniques
Advanced techniques involve replacing multiple guides simultaneously or skillfully repairing stripped guide feet, demanding precision and experience for optimal rod performance.
These repairs require a deeper understanding of epoxy application and thread wrapping for lasting results.
Replacing Multiple Guides
Replacing multiple guides simultaneously is often necessary when corrosion or damage affects several sections of a fishing rod. This approach ensures consistent performance and aesthetics.
Carefully remove all damaged guides, thoroughly clean the rod shaft, and meticulously re-wrap the thread, ensuring proper alignment and tension for each new guide.
Apply epoxy evenly, covering the thread wraps completely, and allow sufficient curing time for a durable and professional finish. This method restores the rod’s integrity.
Repairing Stripped Guide Feet
Stripped guide feet, where the foot has lost its grip on the rod blank, require careful attention. A repair kit can help restore the connection, preventing further damage.
Thoroughly clean the area with guide foot solvent, then carefully apply epoxy under the guide foot, ensuring full contact with the rod blank. Secure the guide temporarily while the epoxy cures.
Reinforce with additional thread wraps if needed, creating a strong and lasting bond. Proper preparation and epoxy application are crucial for a successful repair.
Choosing the Right Repair Kit
Selecting a fishing rod guide repair kit depends on kit contents, quality, and your specific rod type—consider budget and the extent of damage.
Ensure the kit includes appropriate guides, epoxy, and thread for effective repairs, enhancing your fishing experience.
Kit Contents and Quality
Fishing rod guide repair kits vary significantly in their contents and overall quality; a comprehensive kit should include a selection of replacement guides – tip tops and running guides – alongside epoxy resin and hardener.
High-quality kits feature durable guides with stainless steel frames and ceramic rings, ensuring smooth line flow and longevity. The epoxy should be a reliable brand, offering strong adhesion. Wrapping thread is also crucial, and some kits include helpful extras like reaming tools or solvents.
Prioritize kits with positive reviews and detailed component lists to guarantee a successful repair.
Consider Your Rod Type
Selecting the appropriate fishing rod guide repair kit necessitates considering your rod’s specific type and usage. Different rods – spinning, baitcasting, or fly rods – utilize varying guide sizes and styles.
Kits often cater to specific rod types, offering compatible guides. For example, a saltwater rod demands corrosion-resistant guides, while a lightweight freshwater rod benefits from smaller, more sensitive options.
Ensure the kit’s guides match your rod’s original specifications for optimal performance and a seamless repair.
Budget Considerations
Fishing rod guide repair kits vary significantly in price, ranging from basic, affordable options to comprehensive, professional-grade sets. A simple rod tip repair kit can be acquired for just a few dollars, offering essential components for minor fixes.
However, more extensive kits with a wider selection of guides, higher-quality epoxy, and specialized tools will naturally cost more.
Assess your repair needs and skill level to determine a budget that balances cost and functionality.
Maintaining Your Repaired Rod
Regular cleaning and proper storage are crucial for preserving your fishing rod after a guide repair, ensuring longevity and peak performance.
Consistent inspection helps identify potential issues early, preventing further damage and costly repairs.
Cleaning and Storage
Following a guide repair, meticulous cleaning is paramount; gently wipe down the epoxy with a damp cloth to remove residue and protect the finish.
Avoid harsh chemicals that could compromise the epoxy bond or damage the fishing rod’s finish.
Store your repaired rod in a protective case or sleeve to shield it from dust, sunlight, and physical impacts.
Proper storage prevents future damage and maintains the integrity of the repair, extending the life of your valuable fishing equipment.
Regular Inspection
Consistent inspection of your fishing rod, especially after repairs, is crucial for identifying potential issues before they escalate.
Carefully examine the epoxy around the guides for cracks or chips, and check the wrapping thread for fraying or loosening.
Feel for any roughness on the guide inserts that could damage your line.
Proactive inspection allows for timely intervention, preventing minor problems from becoming costly repairs and ensuring continued enjoyment of your fishing adventures.
Where to Purchase Repair Kits
Fishing rod guide repair kits are readily available from online retailers and local fishing tackle shops, offering convenience and accessibility for anglers.
Numerous options exist to suit various budgets and repair needs.
Online Retailers
Online retailers provide a vast selection of fishing rod guide repair kits, often with competitive pricing and detailed product descriptions.
Major platforms like Amazon and specialized fishing supply websites carry numerous kits, ranging from basic options to comprehensive sets.
Customers benefit from the convenience of home delivery and the ability to compare different brands and kit contents easily.
Reading customer reviews is highly recommended to assess kit quality and suitability before purchasing.
Local Fishing Tackle Shops
Local fishing tackle shops offer personalized service and expert advice when selecting a fishing rod guide repair kit.
Knowledgeable staff can assist in choosing the right kit based on your specific rod type and repair needs, providing valuable insights.
Supporting local businesses fosters community ties and allows for immediate access to necessary supplies.
You can often find kits not readily available online, and benefit from hands-on examination of the components.
Troubleshooting Common Issues
Epoxy not curing or thread slipping during fishing rod guide repair can occur; ensure proper mixing ratios and adequate curing time for success.
Epoxy Not Curing
Epoxy failure to cure is a frequent issue in fishing rod guide repair kits. Incorrect mixing ratios of resin and hardener are a primary cause; precise measurement is crucial.
Low temperatures significantly impede the curing process, so maintain the recommended temperature range. Insufficient mixing, leading to unreacted components, also prevents proper hardening.
Ensure thorough mixing for several minutes, scraping the sides and bottom of the mixing container. Contamination, even a small amount of water, can inhibit curing, so use clean tools.
Thread Slipping
Thread slipping during fishing rod guide repair often stems from inadequate surface preparation; ensure the rod is clean and free of oils or residue before wrapping.
Applying a thin coat of guide foot solvent promotes adhesion. Insufficient epoxy application beneath the thread allows it to move during the curing process, causing slippage.
Use consistent tension while wrapping, avoiding gaps or overlaps. A quality wrapping thread designed for rod building is essential for a secure hold, preventing unraveling and slippage.
Resources for Further Learning
Explore online forums and tutorials for detailed guidance on fishing rod guide repair, alongside manufacturer websites offering specific kit instructions.
Collins Dictionary provides translation assistance, while resources like Milliken Fishing demonstrate repair techniques for enhanced understanding.
Online Forums and Tutorials
Fishing enthusiasts frequently share knowledge and troubleshooting tips on dedicated online forums, offering a collaborative learning environment for rod guide repair.
Numerous video tutorials, like those showcased by Milliken Fishing, visually demonstrate the repair process, from removing damaged guides to applying epoxy correctly.
These platforms often feature detailed discussions on specific kit components, epoxy mixing ratios, and advanced techniques, fostering skill development.
Accessing these resources empowers anglers to confidently tackle rod maintenance and extend the life of their valuable equipment.
Manufacturer Websites
Fishing rod and repair kit manufacturers often provide detailed product information, including specifications for guide sizes and epoxy application guidelines on their websites.
These resources frequently feature downloadable manuals and instructional videos, offering direct support for using their specific repair kits effectively.
Checking manufacturer sites ensures compatibility with your rod type and access to the latest recommendations for optimal performance and longevity.
They also often list compatible replacement guides and troubleshooting advice.
Comments